I. Introduction
Backtesting is the process of evaluating a trading strategy by testing it on historical market data. By using historical data, traders can see how their strategy would have performed in the past and make adjustments to improve their results.
Backtesting by forexthrive
Backtesting is essential for traders who want to avoid making costly mistakes and improve their chances of success. It allows traders to test their strategies in a controlled environment, identify areas for improvement, and fine-tune their approach. By thoroughly testing their strategies before entering the market, traders can make more informed decisions and trade with greater confidence.
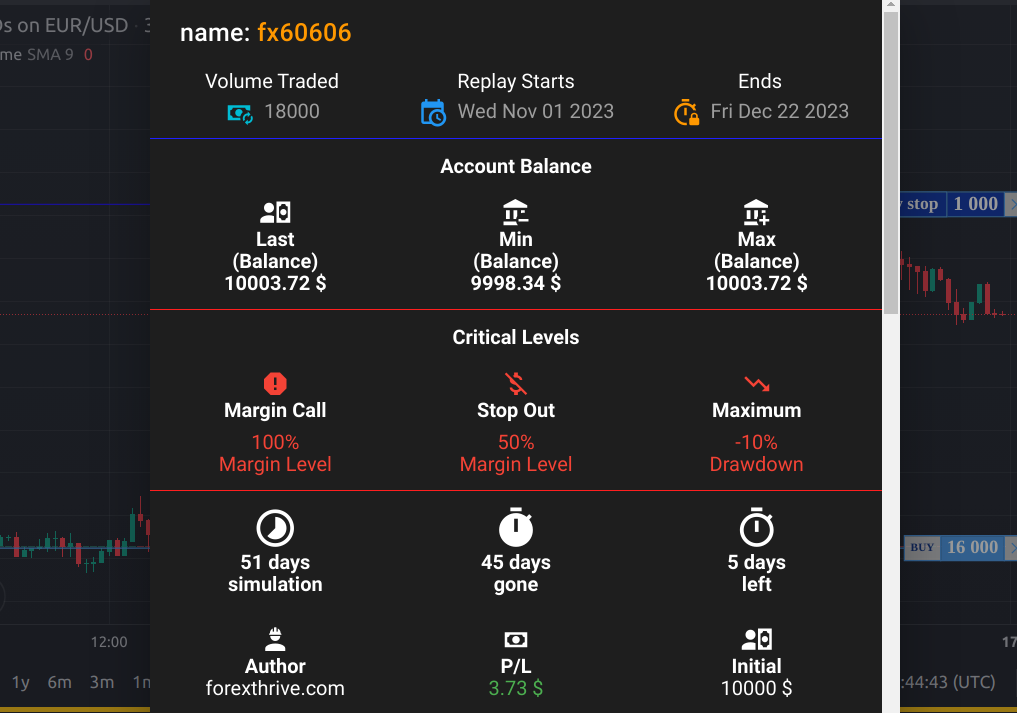
Our backtesting tool is designed to make the process of backtesting easier and more efficient. It can store many backtesting sessions, which we call "backtesting games". Each game instance is fully customizable, allowing traders to set custom values for the testing time-span, margin account requirements, initial equity, trading instruments, brokerage fees and many other parameters.
One of the key features of our backtesting tool is the ability to customize the values for all trading instruments. Traders can set separate leverage, commission, spread, and broker-admin fees for each instrument. This level of customization allows traders to get a realistic picture of how their strategies would have performed under specific market conditions.
In addition to customizable values for each instrument, each game instance also has critical levels such as the maximum draw-down, minimum account margin, and max margin level. This information is critical in determining the risk tolerance and profitability of a trading strategy.
Our trading simulator also has built-in game constraints to ensure that traders are using strategies that are aligned with their risk tolerance and investment goals. This helps traders avoid over-leveraging their positions or taking on too much risk.
II. Setting Up the environment
In order to get started you need to set up your backtesting environment. This includes creating an account, adding and configuring new game, optionally setting some custom trading parameters.
Creating an Account
The first step in setting up your backtesting environment is to create a account. This will give you access to the app including historical market data that you need to run your tests. Your first sign-in will create the account automatically as well as free game including 3 months of history data for all major forex trading pairs.
Setting Custom Trading parameters
Once logged in to your account, your are ready to start executing trades with the default setup or you can set some basic configs that will make your back-testing easier and more accurate. This includes setting up defaults as (Take Profit/ Stop Loss), enable or disable trade alerts, adding indicators or drawings to the chart.
For some trading strategies the most important parameter is the transactional costs which is the price that we pay to open/close or maintain our trades. Trading Fees can have a significant impact, profits easily could got eaten by fees. Traders often set higher fees for their testing activity in order to offset hidden risks, avoid false positives and get more accurate results. Each game could be configured with custom leverage, initial account margin, dynamic or fixed spread, trading commissions etc..
All charting functionality is freely available on the initial game, while some customization related to trading would require upgrade. Its important to keep an eye on the critical risk related metrics as Max Draw-Down and Use of Leverage.
III. Understanding Market Data
The type and quality of historical market data can significantly impact tested strategy performance. Our algorithm is built to replay one-minute OHLC (open, high, low, close) bars. While some trading strategies require tick data, which provides the smallest possible price movements with details of each bid and ask. This is often the case with HFT trading strategies (High-frequency trading), which are mostly algorithmic and employed by the largest players. However, some traders prefer higher frequency manual trading on smaller time frames like 15s or 1s, a trading style that can be extremely stressful, difficult and expensive (more trades, more fees). Since our main goal is to help retail traders, and as we all know, retail traders often face the worst trading conditions, such as slower order execution, wider spreads, slippage, and commissions, plenty of reasons to put tick-data driven strategies in to the "STAY AWAY" category. Therefore, we choose one-minute bars as "Golden Mean" the perfect balance between quality and quantity.
Order Types
1. Market Order
- Buy - Long position
- Sell - Short position
A market order is a type of order to buy or sell a financial instrument, such as a stock, currency, or commodity, at the current market price. When you place a market order, you are essentially telling your broker or trading platform to execute the trade as soon as possible, at the best available price on the market.
For example, if you want to buy a certain currency pair and you place a market order, the platform will execute the trade at the current ask price (the price at which sellers are willing to sell the currency), which is the best available price at that moment.
Market orders are generally executed quickly, as there is no price limit or range specified in the order, and they are often used when speed of execution is more important than the exact price at which the trade is executed. However, it's important to note that the execution price of a market order may not always be exactly what you expect, especially in very volatile markets or with low liquidity.
2. Limit Order
A limit order is an order to buy or sell a financial instrument at a specific price or better. When you place a limit order, you are essentially setting a maximum price (for a sell order) or a minimum price (for a buy order) at which you are willing to enter or exit the market.
- Buy Limit Order
- Sell Limit Order
- Buy Stop Limit Order
- Sell Stop Limit Order
Buy limit order: A buy limit order is a type of limit order that is placed below the current market price. This means that you want to buy the financial instrument at a lower price than the current market price. When the price of the instrument falls to your specified buy limit price, the order is triggered and the trade is executed.
Sell limit order: A sell limit order is a type of limit order that is placed above the current market price. This means that you want to sell the financial instrument at a higher price than the current market price. When the price of the instrument rises to your specified sell limit price, the order is triggered and the trade is executed.
Buy stop limit order: A buy stop limit order is a type of limit order that is placed above the current market price, but below a specified trigger price. This means that you want to buy the financial instrument at a higher price than the current market price, but only if the market continues to move in your desired direction. When the market price rises to your specified trigger price, the order becomes a limit order and is executed at or below your specified buy stop limit price.
Sell stop limit order: A sell stop limit order is a type of limit order that is placed below the current market price, but above a specified trigger price. This means that you want to sell the financial instrument at a lower price than the current market price, but only if the market continues to move in your desired direction. When the market price falls to your specified trigger price, the order becomes a limit order and is executed at or above your specified sell stop limit price.
3. Conditional Orders
Bracket Orders: Bracket orders are designed to help limit your loss and lock in a profit by "bracketing" an order with two opposite-side orders. A BUY order is bracketed by a high-side sell limit order and a low-side sell stop order. A SELL order is bracketed by a high-side buy stop order and a low side buy limit order. The order quantity for the high and low side bracket orders matches the original order quantity. You can create bracket orders in our app to automate your backtesting process how to use bracket orders
One Triggers Another: OTA is a type of conditional order commonly used in trading. OTA orders consist of two parts: the primary order and the secondary order. The primary order is the initial action you want to take, like buying or selling a security. The secondary order is a contingent action that is executed only if the primary order is filled. Test OTA orders in our app for free, see how it can optimize your trading strategy development how to OTA orders
One Cancels All: OCA is a type of conditional order used in trading to group multiple orders together with the stipulation that if one of them is executed, the others are automatically canceled. OCA orders are useful for implementing trading strategies that involve multiple scenarios, ensuring that only one of those scenarios can be executed.
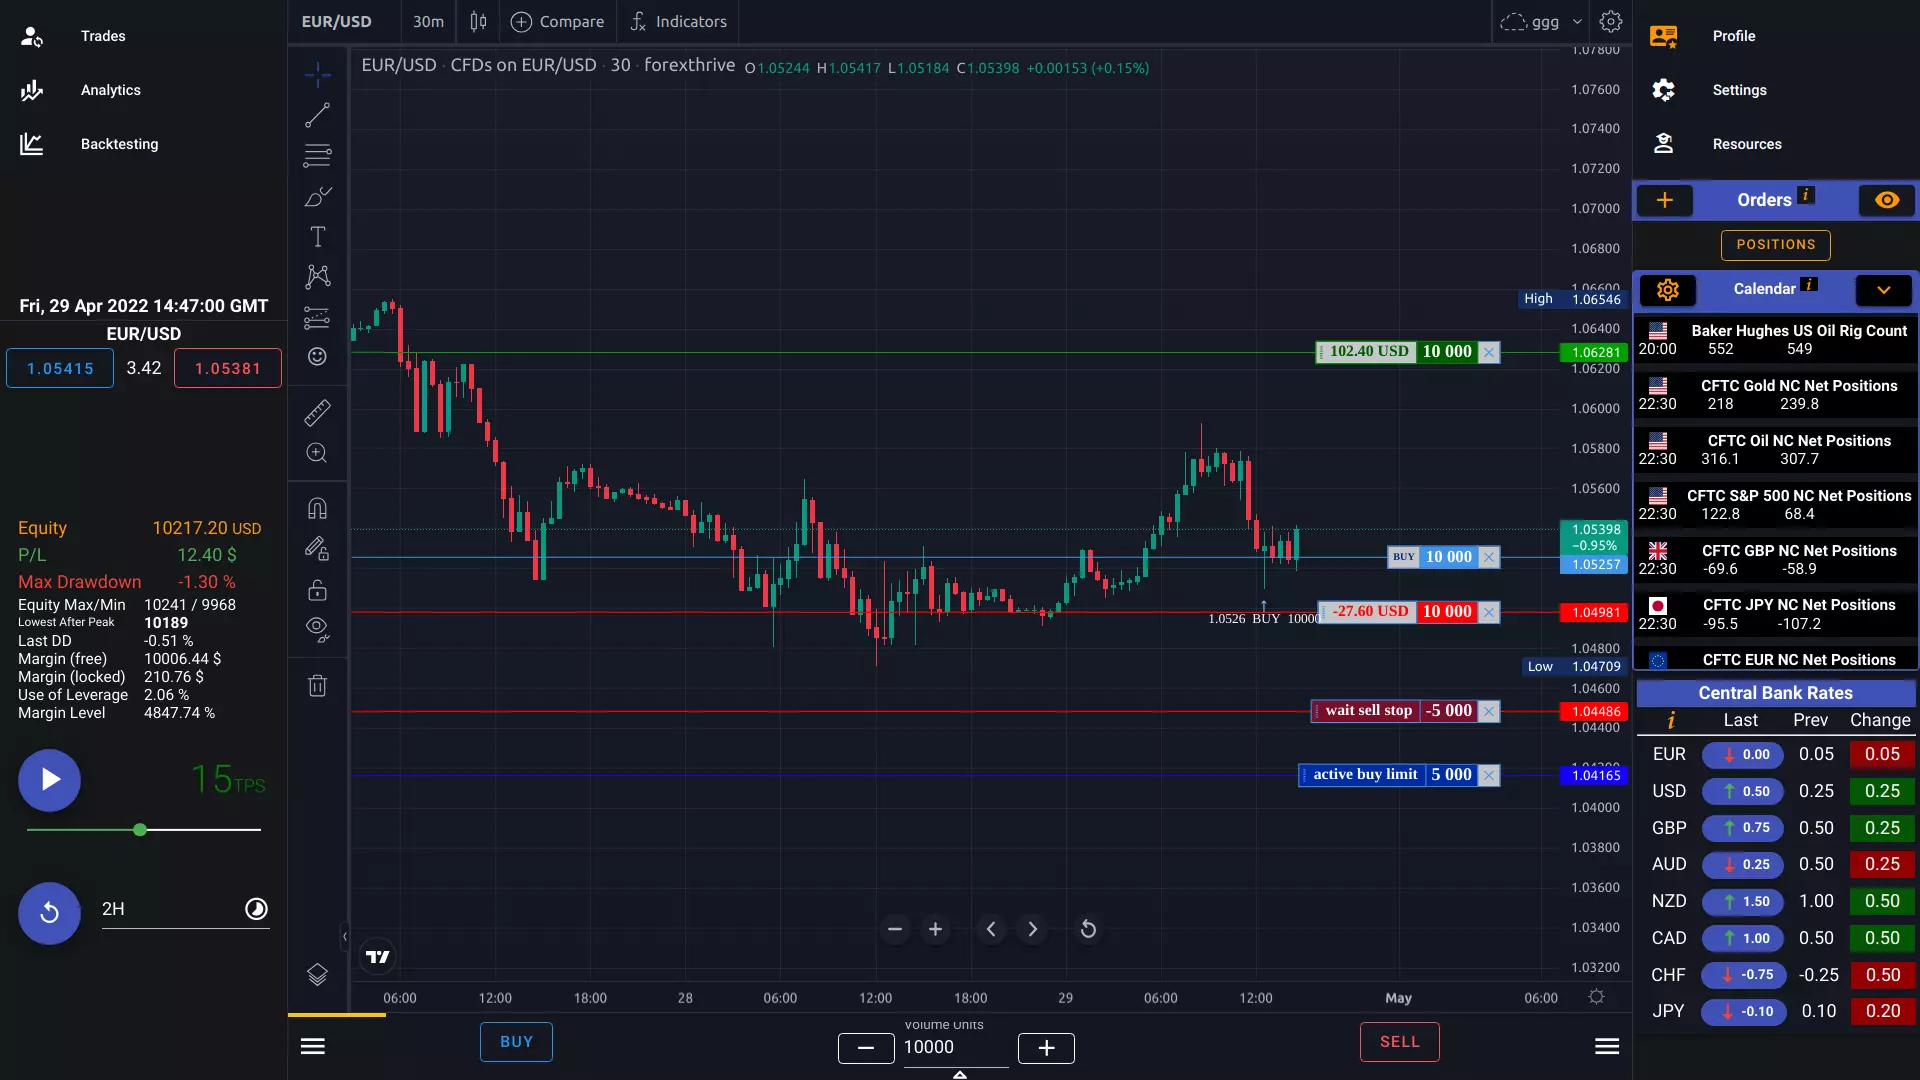
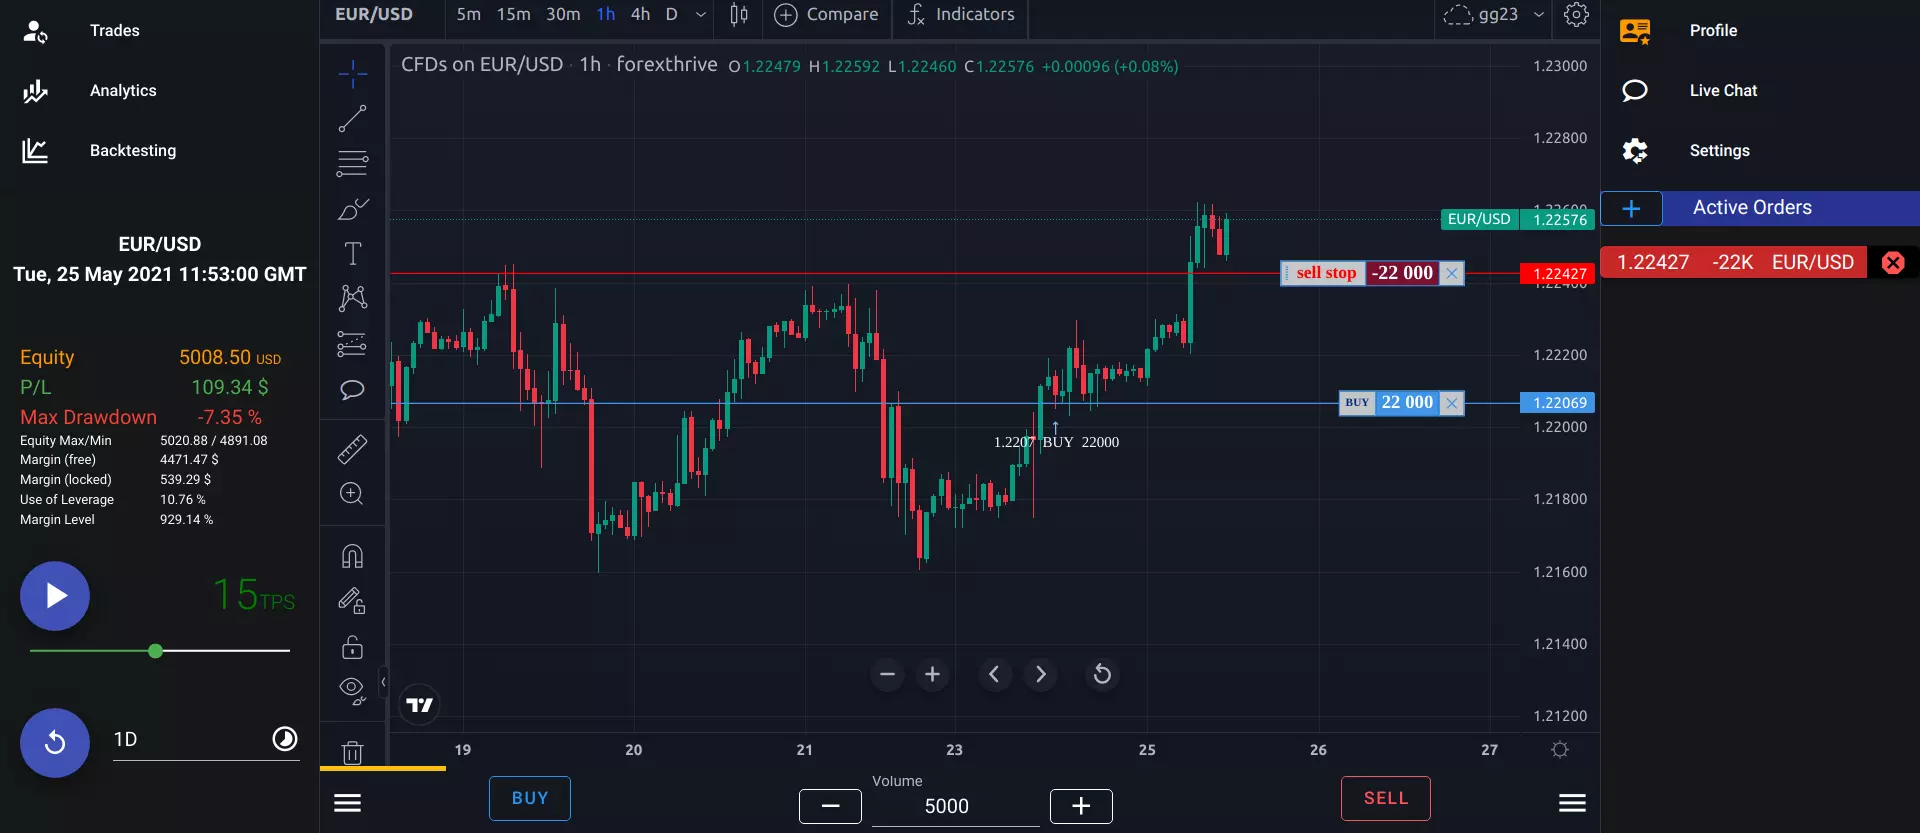
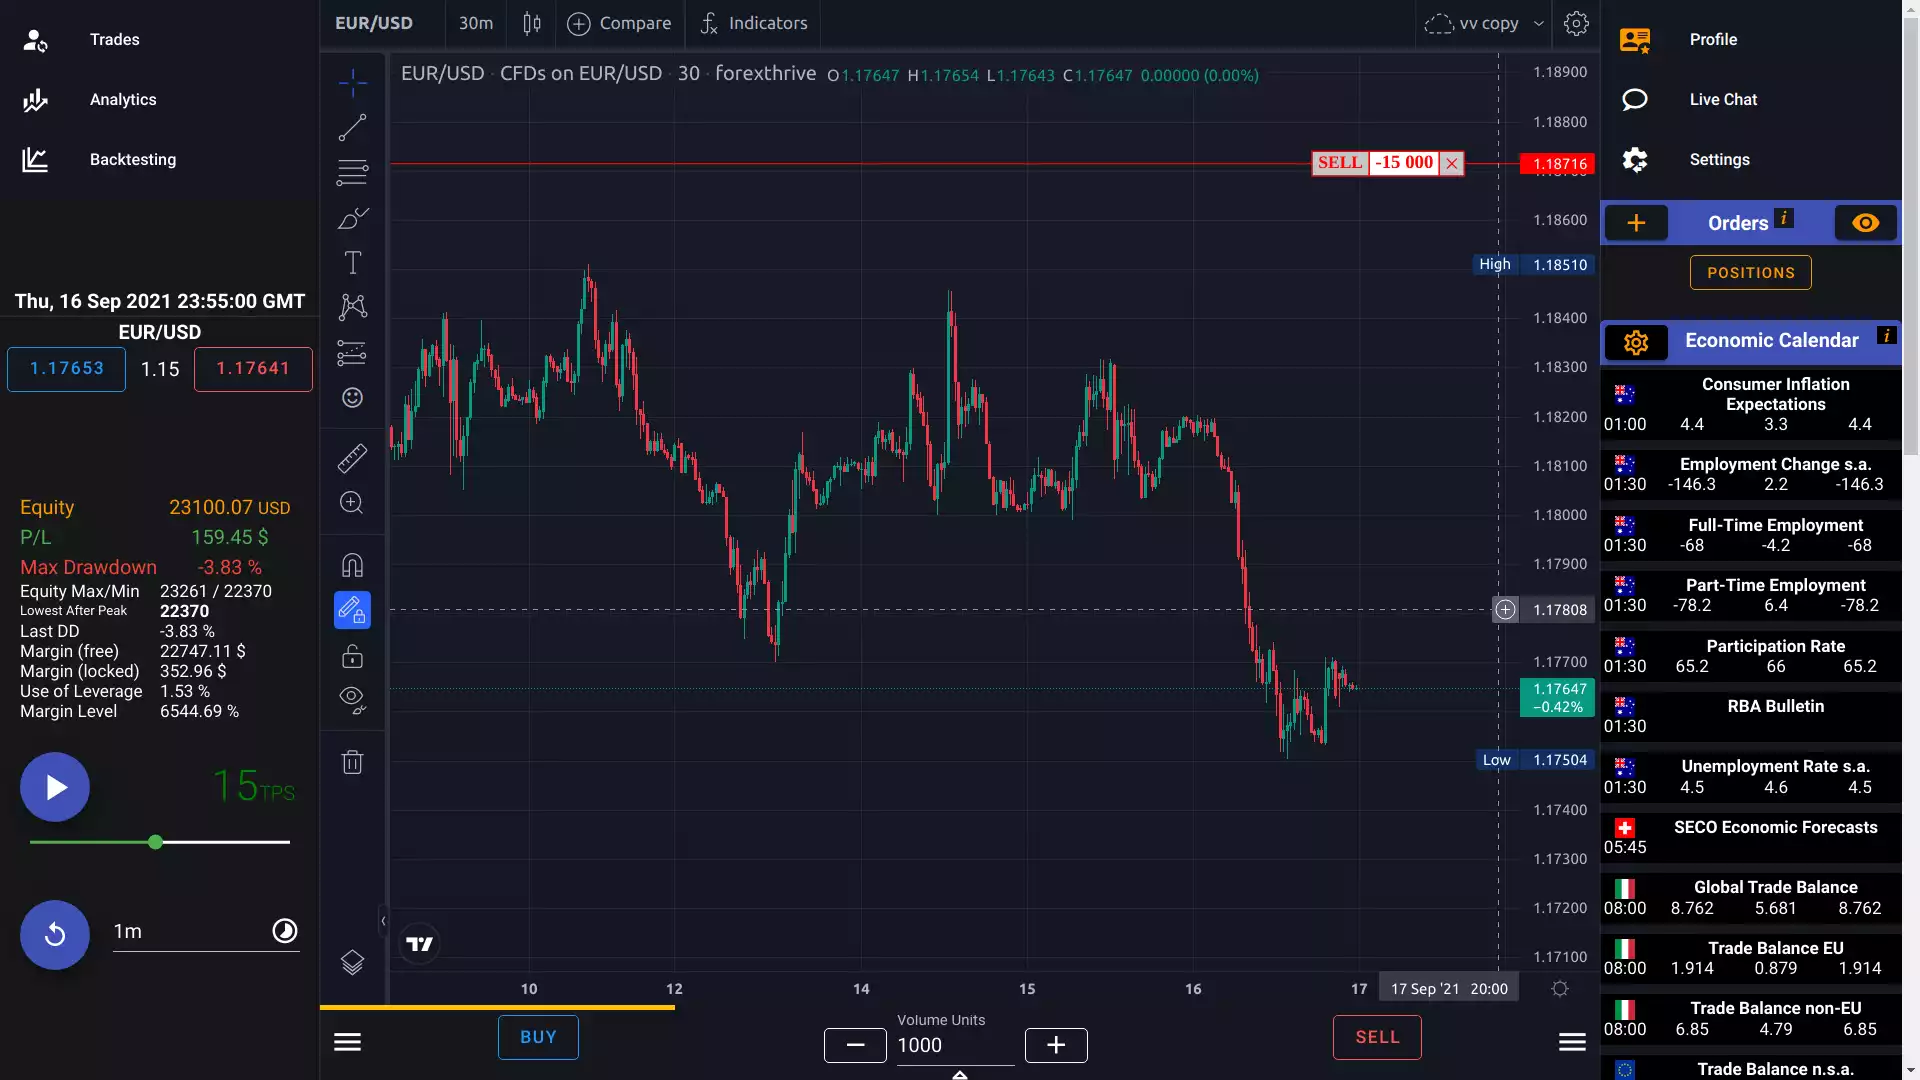
Explaining Trading Simulator Parameters
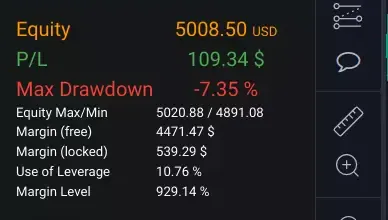
Equity: Equity refers to the current value of your backtesting game account, including any profits or losses that you have incurred on open positions. It is calculated as follows:
Equity = Balance + Floating Profit/Loss
Where "Balance" is the amount of money you have into your backtesting game account, and "Floating Profit/Loss" is the unrealized profit or loss on your open positions.
Max Drawdown: Max drawdown is the maximum percentage loss from a peak in the equity of a backtesting game account to a subsequent low point. It is calculated as follows:
Max Drawdown = (Peak Equity - Trough Equity) / Peak Equity
Where "Peak Equity" is the highest equity value reached in the backtesting game account, and "Trough Equity" is the lowest equity value reached after the peak.
Margin (free): Margin (free) is the amount of money that is available in your backtesting game account to open new positions. It is calculated as follows:
Margin (free) = Equity - Margin (locked)
Where "Margin (locked)" is the amount of money that is currently being used to maintain open positions.
Margin (locked): Margin (locked) is the amount of money that is currently being used to maintain open positions. It is also referred to as "Used Margin".
Use of Leverage: Use of leverage refers to the amount of leverage that is being used to maintain open positions in your backtesting game account. It is calculated as follows:
Use of Leverage = (Margin (locked) / Equity) x 100
The result is expressed as a percentage.
Margin Level: Margin level is the ratio of equity to used margin, expressed as a percentage. It is calculated as follows:
Margin Level = (Equity / Margin (locked)) x 100
Max (Floating P/L): Max (Floating P/L) is the maximum unrealized profit that has been achieved on any open positions in your backtesting game account.
Min (Floating P/L): Min (Floating P/L) is the minimum unrealized profit that has been achieved on any open positions in your backtesting game account.
Open position: details dialog overview
To show the position dialog simply click/tap on the trading position object, the field where trading volume (1) is displayed.
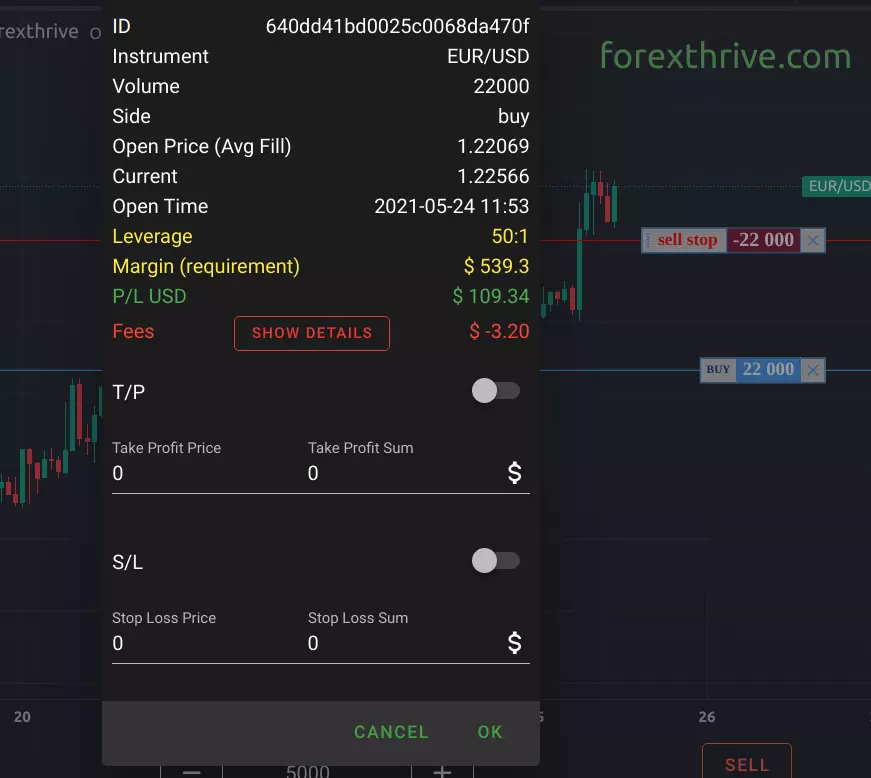
- ID: This is a unique identification code assigned to the trade for record-keeping purposes.
- Instrument: This refers to the currency pair being traded, in this case, the EUR/USD.
- Volume: This represents the size of the position taken in the trade, which is 22,000 units of the base currency (in this case, the euro).
- Side: This indicates whether the trade is a buy or a sell, with "buy" meaning that the trader is expecting the base currency to appreciate relative to the quote currency and "sell" meaning that the trader is expecting the base currency to depreciate relative to the quote currency.
- Open Price (Avg Fill): This is the average price at which the order was filled, which is 1.22069 for this trade.
- Current: This is the current market price for the currency pair.
- Open Time: This is the date and time at which the trade was executed.
- Leverage: This refers to the amount of leverage used in the trade, which is 50:1, meaning that the trader is required to have 1/50th of the total position size as margin.
- Margin (requirement): This represents the amount of margin required to open and maintain the position, which is $539.3 in this case.
- P/L USD: This is the profit or loss in US dollars for the trade, which is currently $109.78.
- Fees: This refers to any fees or commissions paid to the broker for executing the trade, which is -$3.20 in this case.
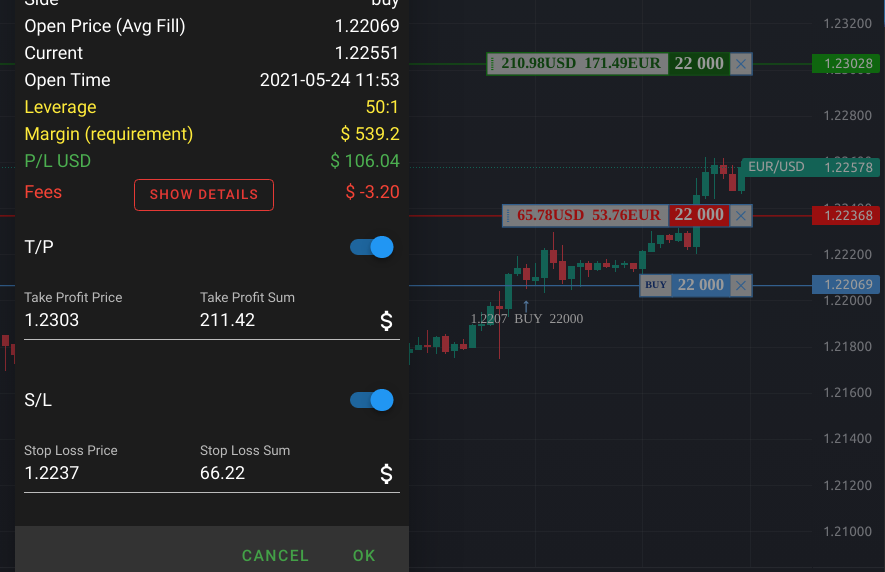
In forex trading, T/P stands for "Take Profit" and S/L stands for "Stop Loss".
Take Profit Price (T/P): This is the price at which the trader has set a limit for their profit. When the market price reaches this level, the position will automatically be closed, and the profit will be realized. In this example, the Take Profit Price is 1.2303.
Take Profit Sum: This is the estimated profit that will be realized if the Take Profit Price is reached. In this example, the Take Profit Sum is $211.42.
Stop Loss Price (S/L): This is the price at which the trader has set a limit for their loss. When the market price reaches this level, the position will automatically be closed, and the loss will be realized. In this example, the Stop Loss Price is 1.2237.
Stop Loss Sum: This is the estimated loss that will be realized if the Stop Loss Price is reached. In this example, the Stop Loss Sum is $66.22.
Take Profit and Stop Loss are important risk management tools used in forex trading to manage potential losses and profits in a trade. By setting a Take Profit level, a trader can lock in profits at a specific price level, while a Stop Loss level limits potential losses by closing the trade if the market moves against the trader beyond a certain point.
Related guides
-
 Guide
GuideBacktesting Starter
Backtesting Starter Past performance might be indicative of future results. If your trading strategy's backtesting results are predominantly negative, the likelihood of continue…
-
 Guide
GuideTrading Strategy Development
Trading Strategy Development This tutorial will guide you through the process of simple trading strategy development. A trading strategy is a set of rules or guidelines that a t…
-
 Guide
GuideFX Swap Calculation
What is overnight financing fee or "SWAP" Retail forex brokerage firms often charge or credit traders (valid for CFDs) with a swap rate when they hold a position overnight . Thi…